Translate

Thursday 27 August 2015

No Line Colouring Tutorial.


Hello,

I'm back with a step by step tutorial on colouring with no lines. I'm not going to tell you this is an easy thing to do because it's not easy but it's not uber hard either. I am no expert on no line colouring but it was recently suggested to me that I do a no line colouring and because its been a long time since my last one I wasn't feeling comfortable about it so I thought I'd do a practice run using 'Steampunk Gift' first and although it's not perfect it turned out alright.


steampunk-gift 1_result


Then it was onto 'Christmas Eve Countdown' I haven't even coloured this awesome image with lines so I'm not sure what I was thinking lol. I thought it might be easy to take photo's as I went with this image so I could look back and see where the 'lines' were.

Christmas Eve Countdown Card_result

I have put all the photo's onto a collage and numbered them so you don't have to scroll down too much :) with corresponding explanations for each one underneath the pic.

Christmas Eve Countdown Collage 1

Follow this LINK to Zoe's video on how to create the 'No Line' technique in Microsoft word or if using a rubber stamp use a really light coloured ink like Memento - London Fog.

1. To start the colouring I chose to outline the figure and focus on the sky using only one marker which was B37 being very careful not to go over any 'lines'.

2. Then using my new Kirarina WiNK white pen I dotted in some snow falling.

3. I thought I would do the skin and beard next, for his skin I started with YR0000 to dampen the paper then YR000, 00 & 01 to build form in the skin and E04 for his lips. For his beard I used N00 all over and flicked N1 & N2 to create texture.

4. For his hat I used R24 outlining where the darker parts of the hat were then going over the same places with R27 leaving quite a lot of 'white' for the highlighted areas, then R89 in the darkest spots followed by R39 to soften the R89 then over the entire hat with R27. For the 'white' fluffy bits I dotted C1 & C3.

5. Gold! To get the gold effect I used both Copic Markers and Kaszazz Alcohol Markers because I like that combination but I'm sure with whatever medium you use you could get a similar effect. Colouring the watch was the trickiest part because there is so much detail. I used Y13, A1205, A7406 & N8 for the 'glass' part of the goggles. When I finished the image I went back to the watch with a gold metallic and warm grey polychromos pencil to try and add in some of the details.

6. For the Red Jacket I followed the same procedure as with the hat in step 4.

7. On to his pant's and top, I thought I go for a denim look using my Kaszazz Markers, A657, A646 & A2955.

8. Then for his boots and Belt I used N3, 5 & 7. Breaking this image up into individual sections was a great help because I think if I just coloured randomly it would've been more difficult to see where things went.

9. Santa's Bag, I chose to use my YG90's for this as I think it suits the steampunk look. YG 93 to wet the paper then built up the shape of the bag using curved strokes with my marker getting darker as I went. YG95, YG97 & YG99. For the rope I used E55 for the base then put little lines on the rope using E57.

10. Bricks/Chimney. Firstly I coloured the 'mortar' with E27 then the 'bricks' with E21 then dotted the texture of the bricks with E23 and E25. In hindsight I probably should've gone over the whole area with E21 then do the 'mortar' as it would've been easier than going around each brick.

11. The Snow was done with little dots, using C00 as a base on the paper the dotting with C1, 3, 5 & 6.

12. The final touch up, I felt the 'snow was too dark so using a white polycromos pencil I lightened it off by going over the whole snow area. I added detail in the gold area as mentioned above and to create a bit more depth I used a grey and a warm grey pencil to add some shadows.

Then placed the image quite simply on a card.

So that's how I did this 'No Line' colouring I hope you have found this helpful and I would love to see lots of No Line coulourings from you guys in the near future.

Andrea xx

P.S. I almost forgot something that I found very useful was to have the image open on my laptop screen with 'normal' lines to use as a guide :)

Wednesday 26 August 2015

Steampunk Gift - No Lines!

Hello :)

It was recently suggested to me that I do some No Line colouring using the technique Zoe created, so you know me not one to knock back a challenge but I thought I should do a practice run before I tackle my chosen image.

This is my practice image :) 'Steampunk Gift' and let me tell you this isn't easy. My old eyes were straining.


And here it is on a clean and simple card.


I have used 'Alph Mini Caps Chipboard' and Joy from the 'Doodle Giggle Word Chipboard set' and painted them with 'Smooch'. 

I coloured 'Steampunk Gift' with both Copic Markers and Kaszazz Alcohol Markers. 

Reds - R20, 24, 27, 89.
Gold - Y13, A1205, A7406, A122.
Green - G14, 07, 28.
Grey - C3, 5.
Dark Grey - N7
Shadows - W1, 2. 

I will be back soon with my next No Line image and a tutorial on how I did it :)

Till next time

Andrea xx


Sunday 23 August 2015

Butterfly Lily - Thank you

Happy Sunday everyone :)

I'm here today with a 'thank you' card I have made using one of the new versatile floral images from Make it Crafty called 'Butterfly Lily'. I have fond memories of visiting the Melbourne Zoo as a child and spending hours in the butterfly enclosure watching these beautiful creatures and being captivated by the blue butterflies in particular, hence my choice of colour for this one.

Butterfly Lily Card_result

Butterfly Lily_result_result

I have coloured 'Butterfly Lily' with Copic Markers and Kaszazz Alcohol Markers.

Petals - RV00, 23, A230, A199 A201

Stem/Stamen - YG01, 03, 17, YR12, 15

Butterfly - W6, 7, 9. B00, 02, 05.

I have used ByDIEzyne Dies - 'Dotted Wings and Puffy Things' and 'Pierced Ovals' 


Thanks for stopping by

Andrea xx


Wednesday 19 August 2015

Wishing for Spring, in Australia


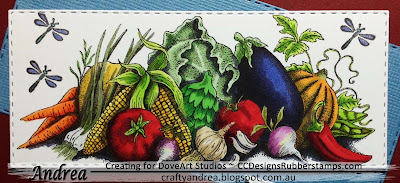
G'Day, I'm back again this time with 'Harvest Delight' from DoveArt Studios.

Whilst colouring this stamp all I could think about was Spring and the abundance of yummy fresh vegetables and warm days, just two weeks to wait till it's Spring here :) not that I'm counting...much. 


I coloured 'Harvest Delight' with Copic Markers. (So many)

Egg Plant - BV13, 17, 08
Pumpkin - YR15, YG95
Chilli/Tomato - R24, 27, 39, 89
Corn - Y15, 18, 19
Carrot - YR02, 04, 07
Turnip - V1, 5, 6, Y00, C1
Garlic - W1,2
Squash - Y21, 26, 28
Brown Onion - E42, 43
Spring Onion - G85, 99, C1
Artichoke - G14, 07, 09
Cauliflower - G12, 21, 46
Peas - YG03, 05, 17
Shadows - BV25.
Such a colourful array of yummy! 

You can purchase 'Harvest Delight' HERE

Andrea xx


Tuesday 18 August 2015

Lotus Bloom

Hello :) 

I'm here today with my latest Make it Crafty card, I have chosen to use one of the NEW digital images 'Lotus Bloom'  it's a stunning image and I hope I have done it justice.

  Lotus blossom card_result      


Lotus blossom cardish (2)

When I started colouring this image I thought I had done an ok job of it although I felt maybe I need to go a little darker on the flowers so I shared a photo (not these ones) with the other MiC Gals and they encouraged/pushed ok shoved me to not only go darker with the colours but loads darker with the shadows and I'm so happy they did but let me tell you I felt like I had run a marathon when I was finally finished, stepping out of one's comfort zone is not easy.

Here is a list of Copic Markers I used on the image -

Lotus - YR000, 00, 04, 17, RV000, 00, 21, Shadows - W2, 4, 5, BV23, 25. Leaves - G02, 05, 46, 28, Shadows - N5, 7. Water - BG72, 75, 78, white gel pen. Reeds/Grass - YG93, 95, 97, BG75, E44. Sky - B21, 41.

Andrea xx

Monday 17 August 2015

Beautiful Himilayan Poppy - DoveArt Studios.


Hello, I'm here today with the beautiful Himilayan Poppy, such a delight to colour. 


I have coloured the poppies with Copic Markers.

Petals - B12, 21, 23, 63, 66
Stamen - Y13, 15, 18, YG17
Stems/Buds - YG03, 25, 17.

You can purchase 'Himilayan Poppy' or any other DoveArt Studios stamps HERE

I also used the Big Stitched and Pierced Rectangle Dies from ByDIEzyne Dies.

Thanks you

Andrea xx 


Thursday 13 August 2015

Chantelle at the Races - Cropped


G'Day everyone :) back today with one of my latest cards.

This time I have chosen 'Chantelle at the Races' Digital image firstly because Dorinda has set a challenge in the 'Facebook Group' to colour feathers as she has recently coloured the NEW Kingfisher Bird image so me being a bit cheeky and because she didn't specify that it should be colouring with new kingfisher image I decided to colour Chantelle's feathers lol.

Also because the CAS Challenge this month is 'Cropped Image' I thought I'd give that a go too. Zoe has made a video on how to crop images Here.


Chantelle Crop Card.._result


Chantelle Crop 4 (2)


So after I printed this lovely I starting colouring her skin using YR0000 to cover/wet the paper then coming in with YR000 to start creating the 'shape' of her skin followed by YR00 to add more depth and slowly working the YR000 and YR00 until I had the result I was happy with, then adding the E93 on the cheeks and E04 on the lips. Using BV20 I worked out where I was placing my shadows, this is really light so easy enough to go over with a YR00 if I wasn't happy, but once happy I went in darker using both BV23 & 25.

The Hair required quite a few different colours to achieve something I was happy with. I started with Y21 all over then Y23 to work out where the darkest areas would be, once that was done I came in with my darkest colour E18 just in the darkest area then moved onto E13, 15, 17 to create the 'strands' of hair going back and forth and adding in some Y23 aswell.

For her Dress and Hat I used some BG colours, BG13 all over but leaving some white areas for highlights followed by BG 15 to start creating form the BG49 create depth blending back through the colours and going over the highlighted areas with BG13 so as not to be stark white and finishing with BV23 & 25 for the shadows.

I used both Copic Markers and Kaszazz Markers for the 'Gold' Roses and Jewellery, going from lightest to darkest and blending as I went. Y11, Y13, A1205, A122 & A7406.

For the 'Fan' part of the Hat I started using my Neutral Grey colours making sure to leave the edges white so I could add the gold colour at the end. I used N5, 7 & 9 just using the darker two colours towards the base of each 'blade' finishing with Y13 & A122 on the edges.

The Feathers started life as violet and teal but doubting this choice I asked a friend for advice and decided to go over the violet with a darker BG colour. Doing tiny flicks to try and make the feathers look real I started with V22, 25 at the base of the feathers then BG10 ,13 from the top going over the violet with BG15. I like that you can still see the remnant's of the violet if you look closely.

So that's how I coloured cropped 'Chantelle at the Races' I hope you find this helpful, until next time :)
Andrea xx
Chantelle is also available in rubber Here.

Sunday 9 August 2015

Enchanted Unicorn!


Hello :)

Blending Outside the Colour Family. August Challenge at Make it Colourful.  Well boy oh boy did this have me stumped. After checking out the work the rest of the design team had come up with and asking poor Zoe loads of questions I think I have finally got it right, maybe.


Enchanted Unicorn Card .. (2)_result

Enchanted Unicorn (2)_result

Here are the Copic colours I have used

Mane - B04 & V04 is that crazy only two colours!! But by blending two very different colours together and leaving a little of the original colours it makes it look like I used more, don't you think?

Body - C1, C3, BV20, BV23, V22, V25 Now although I have used Three different colour families here I haven't blended them as such just dotted the colour around.

Hooves - BV20, 23, 25.  Horn - C3, 5 & Clear Wink of Stella.

The base of the card is 145mm x 115mm (approx 5.7" x 4.5") I have used By DIEzyne Stitched & Pierced Rectangle Dies, the first one is 135mm x 105mm (5.3" x 4.2") and I have adhered that directly to the base card, the next die is 125mm x 95mm (5" x 3.7") and I used mounting tape on this one to give it a lift, I use the same die for the imaged piece but ran it through the bigshot twice with the second time cutting it to 125mm x 70mm (5" x 2.7") and adhered it flat also. Here is a LINK to a youtube video that show how to change the size of the dies.

When printing the images I used Zoe's idea to crop the image to zoom in on it then placed the digital sentiment in line with his hooves and not past his mane so it fits nicely.

Added a little bit of bling to finish the card :) 

I hope this is helpful and that you visit again soon x

Andrea xx


Friday 7 August 2015

It's Time to HOP with By DIEzyne Dies and Doodle Dragon!


WINNERS ANNOUNCED!Thank you everyone for hoping with us. The winners were found on Kim and Lizzy's blogs.

From Kim's-
Denise BryantAugust 7, 2015 at 12:49 PM
Awesome coloring on your cute card! Great set of dies that you used and a fun new stamp too!
From Lizzy's
BunnyAugust 7, 2015 at 5:26 PM
Love this bear. I really liked the coloring and the addition of the charm, pearls and twine. Nice papers.
We hope you love the new Doodle Dragon as much as we do.


We are excited to announce the third release from By DIEzyne Dies and Doodle Dragon.  We are celebrating this weekend on Passionate Paper Creations and Friends Facebook Group and C.C. Designs Facebook Group.

We are kicking everything off with a really big blog hop! 


I have used 'Voodoo Love' from Doodle Dragon Studios, the bigger of the Pierced Half Oval Dies along with the Pierced Oval Dies from By DIEzyne Dies. I coloured the image with Copic's Hearts - R24, 27, 89, White Gel pen. Character B0000, 000, 00, 02, 04, 05, 06. Label - N6, 8, 10. Jar - W1, 2, 3. Cork - E13, 15, 17, 19. Skull - C3, 5. 

Next blog in line is Lizzy

If you get lost here is our hop list-
Andrea - your here!
Make sure to visit each blog and leave a comment. Two of our blogs have prizes to give away, but we are not telling you who! You have until Sunday, August 9th at 8:00pm eastern time to enter for a chance to win.
There are more chances to win over the weekend on Passionate Paper Creations and Friends and C.C. Designs Fan Page - Facebook Groups.
Make sure to come join the party!
Passionate Paper Creations and Friends > Click HERE
C.C. Designs Fan Page > Click HERE
IT ALL STARTS NOW!

Andrea xx

New Challenge!


      NEW CHALLENGE!!  
                    

 Check it out over here >> Make it Colourful Challenge 24 


Andrea xx

Thursday 6 August 2015

Michelle V's Marilyn


Hello :)

I'm here today with a spur of the moment card that I just had to create after seeing this beautiful photo of Marilyn Monroe.

11845932_10205904886599685_904761966_n_result

Isn't she stunning!? I was so inspired by this that I had to give this black & white with a pop of red colouring a go, I knew exactly which Make it Crafty girl I was going to use straight away. The stunning 'Michelle' who is available as part of the 'Colouring Faces ebook'  from Make it Crafty.


Michelle . Card_result


Michelle ... (2)_result


I am quite proud of my efforts with this one but I could not have done it without the help of Zoe and her amazing Colouring Faces eBook  which is so in depth with wonderful step by step instructions that anyone can follow, I couldn't recommend it and in fact all of the Make it Crafty Tutorials highly enough.

I coloured her with Copic's.

Skin - C00, 0, 1, 2, 3. Hair - C5, 7, 9. Clothing - C3, 6, 8, 10. Background - R27. Lips - R20, 24, 27, 89.

The sentiments are from C.C.Designs and the polaroid is from Tiddly Inks (may no longer be available).

So who wins the Michelle v's Marilyn battle? lol.

Andrea xx